Showing posts with label easy craft. Show all posts

Tuesday, December 11, 2012

Salt dough ornaments }{ tutorial


Dear friends, I'm beat. I wish I could tell you all that's going on. Soon.

But the Christmas/holiday season is here and if that doesn't inject a hefty dose of energy into a crafter, I don't know what does. The princess and I have been doing small little projects almost daily. On the weekends we go a little crazier and do more involved crafts, like this one. It can be done in one day, but why would you want to put more rush into your holidays?

Materials for the dough ornaments:

  • 1/2 cup of salt
  • 1 cup of flour
  • 1/2 cup of lukewarm water
  • cookie cutters
  • chopstick or a pencil
  • rolling pin
  • cookie sheet
  • parchment paper
  • aluminum foil
Materials for decoration:

  • white craft paint
  • sharpies
  • glitter paint
  • brushes
Steps:


  1. Preheat oven to 250F.
  2. Mix the ingredients in a bowl. It quickly becomes a pliable but firm dough. It's super easy to manage this one.
  3. With some flour on the rolling pin and surface, roll the dough until it's about 1/4" thick. The thicker you make it, the longer it takes to dry (believe me, the princess didn't want to roll it and ours came out very thick)
  4. Cut shapes with the cookie cutters. Make a hole for the string with the chopstick or pencil
  5. Line a cookie sheet with parchment paper and place the ornaments carefully on the sheet. Cover them with foil and bake it for 3-4 hours (depending on thickness).
  6. Let them dry for a while (we left them alone overnight).
  7. Paint them with the white craft paint and let it dry. Our dried quite quickly because we used a blow dryer on the paint.
  8. Draw designs with the markers, add glitter, or finish whatever look you want to give them. This part is up to your imagination.
  9. Cut some string and put through the holes. Tie a knot and voila, you have ornaments ready to hang on your tree.
I don't know why she's so serious. She was smiling a second before.

We had so much fun making them, and the princess is so proud of hers she took them to school to share with her friends. This is an easy but fun way of making ornaments with the kids.


Tuesday, December 4, 2012

Felt Christmas tree }{ Crafting with kids

A while back I came across this project from Olives and Pickles on Pinterest, and I knew I wanted to try it with the princess. We love Christmas projects and this was easy and fun.

I also had this tray frame that I got on sale and that begged to be used for framing something fun. I put the two together - let the princess make some art and then frame it with the tray. My plan is to use it for different seasons and holidays. Simply change the background and the art piece as the year goes by.


Materials:

  • green and brown felt
  • yellow felt or gold card stock
  • buttons of several colors
  • glue
  • silver glitter
  • a large piece of card stock in a color that contrasts with green and gold
  • a frame


Steps:

  1. Draw a Christmas Tree on a sheet of green craft felt (or you can use a template) and then cut it out.
  2. Cut out a small square of brown felt to be the tree trunk.
  3. Draw and cut the yellow felt or gold card stock in the shape of a star.
  4. Gather some buttons, the glue, and the glitter. 
  5. Let the child decorate the tree. With older kids they could actually do the previous steps as well, but I decided to have it all ready for her to make it a quicker activity. She can get tired quick if it's too hard and involved.
  6. Add the tree and the trunk in the frame facing down.
  7. Place a contrasting card stock sheet on top of the tree for a background. I chose silver since it's sparkly for Christmas and out of the card stock I have it provided the biggest contrast.
  8. Close up the frame and place it somewhere where everyone can see, and show your kiddo how proud you are of their work.

So I did turn the original project into a little art project rather than math play. The great thing about inspiration is that you can turn something you find into something entirely different and have two activities instead of one.

  I'm Topsy Turvy

Tuesday, October 23, 2012

Halloween Lunch Bags }{ Tutorial

With the 31st of October just around the corner, I feel like everything is excuse to do some cute Halloween-y craft. This one is easy, perfect for the little ones in your life, and made with simple materials you can find in almost everyone's home.

So let's get crafting.

What you need:
  • paper lunch bags
  • construction paper in white and black for the mummy (and for the vampire as well)
  • glue
  • scissors
  • crayons and markers for adding details (optional)
What you do (for the mummy, the easiest one):

  1. fold the open end of the lunch bag down about 1/4 of the full length (see picture)
  2. fold the bottom so that both sides are going down (see pictures)
  3. cut out shapes from the constructions paper: white and black circles for the eyes, a crooked mouth, some longer strips of white construction paper.
  4. Glue the strips of white paper all over the bag with the top folded down; lastly add the eyes and mouth. 
  5. For other characters like the vampire or the owl, this is where you'd add some extra details with crayons or markers (e.g. blood on the fangs).


The steps are the same no matter what character you make, but the shapes you cut out and the construction paper colors are different obviously. I can also imagine how easy it would be to do a Frankenstein one, or a skull. What Halloween monster/character would you make?

Sunday, May 6, 2012

Upcycled Lamp ~ girly style }{ Tutorial

Don't you love a good thrifty find?

N.'s room had a tall lamp that didn't really match her girly taste and didn't seem to fit the rest of the room. But I wasn't really looking to buy something new. It needed to be customized.

Then, just the other day I was looking through a garage sale and found a lamp with a nice long, white base with a broken shade. I got it for less than $3... Then I headed to the thrift store and found a  nice shade that fit it. The color didn't matter at all, since I planned on covering it up.

At home, I got a scrap of fabric that was long enough to cover the shade and went to work.

Materials:

lamp shade and base
enough fabric to cover the shade
ruffles (or ribbon)
spray adhesive
fabric glue
craft paint (optional)

Steps:

1. First you need to make a template for the shade to cut use for cutting the fabric. I used directions from this video on how to make the template from the shade itself, and marked it right on the fabric.

2. Then you can cut the fabric a little above the lines from the template (I like to give myself a bit of wiggle room).


3. Next, use spray adhesive to cover both the lamp shade and the wrong side of the fabric. Make sure you cover the surface you're working on... It gets sticky all over with the spray!

4. Then it's time to place the fabric over the shade. This is a bit trickier than you'd think, and don't get frustrated if you have to peel it off and start over. The good thing about spray adhesive is that you can easily that. I started by matching the seam on the original shade with the edge of the fabric, then slowly stretching it around the shade. I started the whole thing 3 times before I got it right.


5. Measure and cut something for the bottom edge of the shade- I used ruffles, but ribbon would have been cute too.

6. Then, using fabric glue, slowly adhere the ruffles to the bottom edge of the shade. Let it sit for a while to dry.


7. Paint small designs on the base using craft paint. (optional)


8. Place the finished shade on the lamp, place it in the room of your choice, and plug it in. You're done!


What's your latest favorite project?

This tutorial has been linked to Skip to my Lou's Made by You Mondays and Sew Can Do's Craftastic Monday

Saturday, October 29, 2011

Little ghost garland }{ tutorial

Do you know one reason (among many) I love Fall? There are so many excuses for crafting and inspiration kisses your face as soon as you walk outside. I'm glad my husband isn't a jealous guy.

With a little one in my house, Halloween is one of these excuses to go crazy creating stuff, costumes, decorations, what have you. We can always use a new item to put up for the season, right? And we do end having so much fun doing it together as a family.


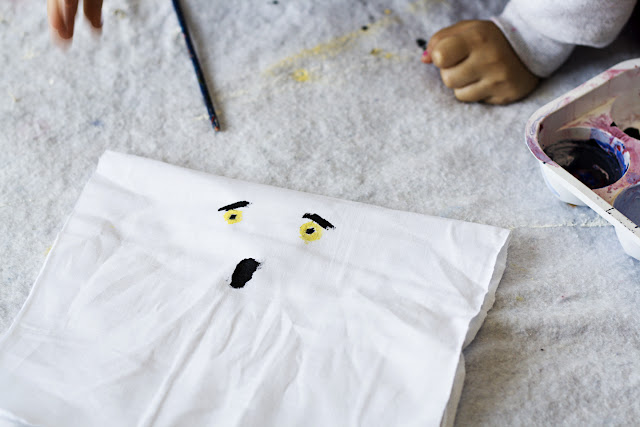
This project I'm sharing is a quick and easy one that we did last weekend - a garland of little ghosts that you can hang anywhere.  N. had a great time with this one. The ghost faces were easy enough that she could do some of them on her own, and she loved the results. She actually kept a few of the ghosts to play with.

What you need:

  • scraps of muslin
  • styrofoam balls
  • string
  • brushes and paint

Steps:


  1. Fold the scrap in half (or a piece of rectangular muslin you cut), then paint the face near the fold.
  2. Place a styrofoam ball under the top, behind the face you painted. Tie the fabric tightly just under the ball with the string.
  3. Repeat with as many little ghosts as you want. 
  4. Once you have your ghosts, place a long string through the knots under their heads and voila. Now all you need is to hang it up anywhere you want.


Happy Halloween everyone!

Wednesday, June 8, 2011

Swan mask }{ Tutorial Thursday

Today's tutorial was inspired by Angelina Ballerina, one of the few cartoons N. actually watches once in a blue moon. (we gave up the tv years ago, but that's a story for another post)

At the end of each episode of Angelina, she narrates a short segment called "Little Stars" where they show young girls in ballet classes doing all sorts of activities. In one particular segment they were showing the little ballerinas making costumes and playing in character for a short while. N. was fascinated by the costumes - and one of them I figured I could actually make! This is my version of the mask they had for the swans in the "Little Stars" Swan Lake.

Materials

  • paper or styrofoam plates
  • ribbon or elastic
  • markers
  • orange and white construction paper
  • scissors or craft knife
  • glue
  • feathers (or any embellishment you want to add, we kept ours simple)
How to make it

Step 1: cut the plate across where your nose will be.

Step 2: cut a small triangle to fit over the bridge of your nose.

Step 3: draw and cut the eyes.

Step 4: cut a medium triangle of orange construction paper and fold 1/8" of its base. Make a half cone shape and glue the folded part over the nose triangle on the plate. 


Step 5: trace the outside of the plate on the white construction paper. Cut the paper about 1/2" below the shape you traced (so you'll have paper to glue on the plate). Cut triangular shapes of different sizes and directions around the line you made on the paper. These will be the swan "feathers."


Step 6: Glue the paper under the line all the way around the edge of the plate. At this point, make one small hole on each side of the swan mask to hold the elastic or ribbon.


Step 7: using a black marker define the edges of the eyes, then using a pink or red marker make swirly "eyelashes" or any shape to make the eyes stronger and more interesting.

Step 8: glue feathers (or other embellishments) to the paper feathers on top of the head. warning: the feathers I used to do this made a mess in my workspace! Even after vacuuming I'm still finding little pieces everywhere. They're taking over my craft area. *sigh*

Step 9: add a piece of ribbon to each side of the mask ti-eying it through the holes made in step 7. These will secure the mask on the wearer's head. I prefer using ribbon because then I can adjust the size depending on who's wearing it, but elastic works wonderfully too.

Here's the finished mask.

We had a lot of fun pretending to be swans and "dancing ballet" around the living room today.

Have you ever been inspired by a show your kids watch? Where do you find your inspiration?
Pin It

Friday, February 4, 2011

Valentines for a toddler

Is it already February? Really? Wow. Time for Valentines!

This year the little one is going to take valentine cards to her daycare friends for the first time. I wanted to do something where she could participate in the making of the cards, so...

What I did was choose some patterned paper and cut it into hearts. Then I cut white card stock into smaller hearts.


I machine stitched them together and then let N. have a go. I gave her some supplies (red paint, stamps, red and white glitter, sponges, and crayons) and let her decorate them however she pleased. 


Each card is one of its kind and made specially by her (well, a lot of it) for her friends. Easy peasy handmade toddler valentines.

Thursday, December 9, 2010

Card-making, merry-making

I couldn't resist. I was inspired by Scarlett at Blue, Purple, and Scarlett and her beautiful cards and just had to go try some of my own. Ok, ok, I know I'm not anywhere near as good as she is, I mean wow! But I wanted some card-making fun anyway.

So, here's what I did:

First I found some colors and patterns that I liked.


I measured everything to scale and to make sure it was centered.


Then I cut up the papers and pasted them together.


Added some embellishments


Until I thought it would do.


Hope you're all having a wonderful day!

Thursday, December 2, 2010

The 5-minute mama crafter

N. watched Frosty the Snowman for the first time a couple of weeks ago. Oh boy. She hasn't stopped talking about snowmen, Frosty, Santa Claus, "Karen," and Christmas in general. It doesn't help that every house in town has put their lights and decorations up (including us).

So yesterday we were killing time and playing before our bedtime routine, and she kept asking me for Frosty. So I decided to make her one with scrap materials we had around. It took us all of 5 minutes too! My favorite kind of baby craft.


Materials:
2 styrofoam balls (one small, one medium; or one medium, one large)
some red felt for the scarf
some black felt for the hat (which quickly got destroyed and thrown away by miss N.)
1 Toothpick
Chenille piper cleaners
Black and orange paper
Glue

How we did it:

I broke the toothpick into a smaller piece, so that I could stick each end of a different styrofoam ball. Then I cut the eyes and mouth out of black paper and glued it on the smaller ball (the face). Cute the red felt into a scarf and glued it where the two balls were connecting. I cut small pieces of the pipe cleaner and stuck them on the sides of the bigger ball for his arms. Then I took another piece of the toothpick and stuck it at the very corner of the mouth (for Frosty's pipe). I tried to imitate Frosty's button nose with black paper, but didn't like the results, so I decided to use a carrot nose (N. didn't notice). I cut a long and narrow piece of orange paper and rolled into a "nose" like you see above, took another piece of the toothpick and glued it to the inside of the orange nose and stuck it in the face (poor Frosty was stabbed a few times during this process...). Then I did something similar to the pipe (cut orange paper, glue the end of the pipe toothpick to the inside).

The hat... It took me the longest, cutting out round pieces of felt for the bottom and top of the hat, then a long one for the wrap around. It looked like a top hat... I glued it to Frosty's head but miss N. wouldn't wait until it dried (I should have used a hot glue gun, maybe?) and the thing got destroyed very, very quickly.

But I really like how it came out anyway, and so after she played with him he proudly went into our balustrade's pine needles among the lights and other things.