Showing posts with label sewing. Show all posts

Wednesday, February 6, 2013

From a belt to a headband }{ diy

And the boxes are still crowding almost every room...

On the other hand, I'm taking this move as an opportunity to purge, clean out, de-clutter. With that comes some reorganizing and considering the fate of many possessions. I'm no hoarder, but I also don't like to waste. I see potential in a lot of random odds and ends. If it sits in my to do list for too long however, it's time for it to go.

So, this month's theme on the blog will be reorganizing and repurposing.

As part of that theme, today's post is about changing a fabric belt into one (or many) headbands. It's so simple and easy, you can even do it without a sewing machine (although the machine makes it that much faster).

Materials: your old belt, some elastic, measuring tape, scissors, needle/sewing machine and thread


Steps: 

  1. Measure your head around the area you want to wear your headband.
  2. Measure your belt from one end to about 4 inches less than your head's measurement and cut it.
  3. Cut about 2 inches of elastic (depending on how stretchy it is, you may want to make it a bit shorter or longer).
  4. Fold the raw edge inward twice (1/4" * 2) and iron (optional but makes it neater).
  5. Place one short side of the elastic in downside of the folded edge and pin. Sew edge.
  6. Place the other side of the elastic on the downside of the other edge, pin, and sew it in place.
  7. Wear your band.


I asked my sister who's living with us to model the headband for me. She's a little shy but reluctantly agreed. Thank you, sis!

Won't you share your repurposing projects?

Thursday, January 24, 2013

3 weeks and 3 projects }{ Valentines Day roundup

Alright, I have a confession: I hate moving. You're thinking "no way that's true, she's moved around like a gypsy!" Fair enough. But I really dislike the packing and unpacking, especially since this time I'm also trying to get rid of as much as I can.

Point of the rant above: I'm still working on getting settled in. The crafting materials are still packed, so what's a girl to do? I thought about digging through my old photos that I haven't shared with you yet. Then I had a better idea. Why not do a roundup of some possible Valentines Day projects? There are only 3 weeks left, and this gives you some options.

Project #1: 3 Heart Tea Bags (by Design Sponge)

Aren't these just adorable? Give yourself a valentine or make some to share with your friends. Valentines Day will be that much more enjoyable, no?

Project # 2: Pie box (by Twig and Thistle)

Well, technically this project is a printable. But I had to include this awesome little box! Nothing says I love you like a little apple pie, yum!

Project # 3: Hearts throw pillow (by Diary of a Quilter)


This project is a bit more involved, but isn't it worth it? Gorgeous! Must.make.one.now.

I hope you try at least one of these. Handmade Valentines keeps the sweetness without the consumerist "Hallmark" holiday feel, right?

Kisses!

Friday, June 1, 2012

Pillow case dress rejection

I took a little bit of time off from writing the article to make a new summer dress for N. It's been so hot here and the child only wants to wear dresses.

Pillow case dresses are easy and quick, so I went with that style. I used some fabric I already had at home and added some pink ribbon for the shoulder tie, some white lace at the bottom, and a small pocket. I was done pretty quickly.


But... She refuses to wear it. She told me I can keep it until her little sister gets bigger. *tears* Her reason?   It's not long enough, she wants very long dresses...

Moral of the story - before taking the time to make clothes for a little one, make sure she likes the style or at least figure out what her *must haves* are. Maybe next time...

Monday, May 14, 2012

How I feel about homemade gifts

Happy belated Mother's Day to all you wonderful moms!

I hope you spent a fun, relaxing, and fulfilling day with your family.

Warning: very subjective opinions coming up...

There are tons of holidays where we feel obliged to give gifts or otherwise spend some kind of money to show our love for someone. That second part isn't bad - we all need to show our appreciation for those around us, especially those who love us, and taking a specific day to remind us of doing that (let's face it, we don't always think about it) can be a good thing. But I do take issue with something: The push for buying gifts can sometimes take away from the meaningful appreciation of those we're supposed to be honoring.

What I mean is that in our crazy busy lives it's so easy to give gifts without thinking about them. But what if we could spend less and give something more meaningful sometimes? That's where I think homemade gifts come in.

Getting a sweet and customized gift will never get old, no matter how big my kids are. I will always love anything my little girls put time and effort in to give me, whether they cook it, draw it, write it, sew it, sing it, whatever. It's their love put in to what they do for me that will make it so special.

Now, I don't expect everyone to agree with me. I know not everyone is a fan of homemade gifts in any case. I just hope my mom is. ;)


What's your gift giving preference/tradition for holidays?

Saturday, April 21, 2012

Montessori style placemats }{ Tutorial

My little N. is 3 1/2 years old! 

It's such a fun age with surprising sassiness, amazing displays of love, and a whole lot of "growing up" behavior. Seriously. I can't blink and she's developed beyond what I thought was possible at this age. 

One thing I've tried to do is to leave some Montessori inspired activities and materials easily accessible for her to use. This particular project came about because she likes to help me get dinner ready. I obviously can't let her do a whole lot when I'm cooking, but she does help setting the table. And I like to encourage her to help and to do it independently. 

I saw these adorable Montessori placemats for sale at A Bit of This and a Bit of That, and it inspired me to make my own. Jo is much better at making them, so check out her shop to see them! But I'm such a diy person that I wanted to try it myself. I'm sharing the process for those of you who want to try it as well. Mine came out a bit bigger than what it needed to, so feel free to decrease the overall dimensions.


Materials
  • fabric for the top (22 in x 14 in) - I used pink checkered cotton
  • backing (22 in x 14 in) - I used muslin
  • fabric scraps in coordinating colors for the utensils, plate, and cup. 
  • scissors
  • Thread and sewing machine
  • iron 

Steps

1) Cut the fork, spoon, knife, plate, and cup out of the scraps of fabric using the templates (link above). The chopsticks were at my husband's request, and for us it's useful. You don't actually have to use the templates. You can take some silverware and place it on the fabric, trace it and cut it.

2) Pin them on the right side of the top fabric. Sew. I used both a straight stitch and a decorative one of top (for extra support and extra fun).


3) Pin the backing to the top, right sides together.


4) Sew around the edges leaving an opening (~3 inches) to turn it over right side out.


5) Iron the opening, folding the edges to the inside. Sew the opening shut.


6) That's it, you're done! So quick right? And now, just put it on the table for your little one to help you set it.


Tuesday, March 20, 2012

A mixed media card }{ tutorial

I'm calling this post a tutorial, but in truth it's more of a process post. What I mean is, if you follow the steps, you may be using the same process I did, but most likely your card won't be the same. You might change the colors, the background, the final touches, etc. In any case, it's been a while since I did a tutorial-like post.

To be completely honest, I'm not 100% happy with how it came out at the end. So I'm asking for help. What would you have done differently?

This all started with an idea to sew ripped up music sheets together. I didn't know anything else about the project, only that it had to include that. The whole process went along without planning ahead - after each step I'd try to think "what's next?" So I gathered a bunch of things I might use, but here's a final list of what I did use:


  • watercolor paper
  • old sheets of music
  • alcohol-free ink
  • walnut ink spray
  • sketch paper and pencil
  • gesso
  • watercolors (and brush of course)
  • scissors
  • matte gel
  • ribbon
  • small jewel
  • sewing machine and thread
And the process:


  1. Cut a piece of watercolor paper and sprayed it with pink ink. 
  2. Then grab a ripped up piece of sheet music


  1. Rip the sheet music into 4 smaller pieces and then sew them together.


  1. Press the edges of the sheet music on the ink pad


  1. Sketch some girls on separate piece of paper. This step in particular can easily be made simpler by using a stamp, like these.


  1. Decide which image to use, color it (or not), and cut it. I used watercolor for this, but I've seen people do amazing cards with copic markers and other supplies too.


  1. Decide on an arrangement on the background paper and paste it together using matte gel.
  2. Put on the finishing touches, whatever you deem necessary. I added gesso on the girl for some highlights, as well as some darker colors for shadows here and there. Then I also added some thread using various decorative stitches to the side, then a jewel to her hat, and finally some ribbon.


So back to my question up there, what would you have done differently?

Sunday, March 18, 2012

Spring equals sewing

It happens every year during spring: I get an urge to sew new dresses and skirts, as well as house decor items.

This past week I had so many projects in mind, and although I've started some of them, this is the only one I was able to finish.


I love the way the dress came out and it was so easy (and quick). I picked up the pattern last year on a garage sale I believe and I'm so glad I did.

Fall and winter have me in the kitchen, while springs takes me back to the sewing room and fabric stores... I wonder what summer has in store for me this time.

The seasons influence my lifestyle and creative activities so much. What about you?

Tuesday, September 6, 2011

Back to school

School's back in session. Summers do fly by, don't they?

That means I've been running around like a chicken with the head cut off for the past couple of weeks. Anytime now I'll fall over.

Just kidding, I've got some fight in me yet. But things are crazy for sure.

But, I did manage to make a couple of these:


Pencil cases!

N. has already declared that the pink one is hers (of course), but I put the white and blue one up for sale on Etsy. I think if it was up to her, she's confiscate everything I make...

How's your end of summer?

Tuesday, July 12, 2011

Mini drawstring bags

We had such an eventful weekend over here. It was my husband's birthday and he was home, so we celebrated it with a small party. It was so much fun - friends, good food, and lots of playing. I made some shrimp dip for the crackers, and chocolate cake with brigadeiro frosting and raspberry preserves for the filling.


We also had further proof that our little one is quite the sensitive child - we went to a live entertainment show and she was terrified of the dark lights and loud speakers.

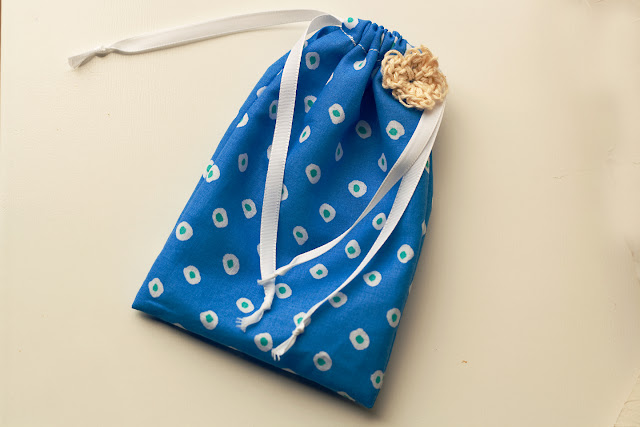
I've also been continuing to work on things for the shop. I finished making some mini drawstring bags, complete with crochet flowers attached. I know some of you were wondering what I'm planning to sell. Well, to be honest, a bit of everything just like on the blog. I just like all the different crafts too much! So,  the shop will have small items of sewing, photography, watercolor, drawing/sketching, crochet and knitting... It's a hodge podge of crafts.


It's been such a busy month already and it will only get busier. I say, bring on the challenges, summer. I love it!

How has your summer been so far?

Tuesday, July 5, 2011

I'm back~

I can't believe how long it's been! I really missed blogging.

And why the absence?

Did you notice the name up there?

I'm opening up a shop! And since the name "No Clever Craft" doesn't, you know, inspire much confidence in my wares... I changed. I'll give a prize to the first person who correctly guesses what Mrs. Ricefield means. Or how in the world I picked this name.

In any case, I'm still figuring out the web designing stuff out, so I won't have a shop in m own website for a few weeks. And I'm still waiting on the licensing department in order to actually list anything for sale... But the name is registered and soon, very soon I'll begin putting my things for sale.

So, I'm back! There's a lot going on around here this next month, and thus I decided on taking it easy, posting two or three posts up each week and not having a set schedule. But I'm back nonetheless.

I will be trying to catch up with your blogs soon, and stopping by to visit. In the meantime, remember the handbag I had started sewing with the fabric I received from my mother in law? Here's the finished product. I quite like it!


How have you all been?! 

Tuesday, June 14, 2011

Handbag }{ WIP Wednesday

True to the name of today's theme, this project is certainly not finished. (how does the time pass so fast every day?)

If you remember it from this post, my mother-in-law sent me some awesome fabric from Japan, and I was dying to get started with some sewing project.  Well, Ta-da!


Yeah, I know right now it's nothing but some fabric cut out. But soon this will be a handbag and a very cute one I think! Think of today's post as Handbag part I, or to be continued. I definitely want to share it once it's finished.

Do your work-in-progress projects ever look like what they're supposed to? 


What's your favorite type of bag or purse?

Friday, April 22, 2011

Sewing skirts

Wanna know a secret? I'm terrified of sewing patterns.  They always make things harder for me. Whenever I can find projects online or figure out ways to sew something cute without patterns, I jump at the opportunity. 

Neither this skirt nor this lion followed a pattern. I just tried to figure things out in my mind. 

A while back a had found this sewing tutorial where you make a skirt out of a dish towel in the wonderful Grace Violet blog, and oh boy, I wanted to try it out so badly. Then yesterday, I was at the fabric store getting some basic supplies (elastic, etc) and saw this adorable dish towel. Hooray! I grabbed it  right way (for less than $5 - it was on sale), so I could finally try out the skirt. 

Check out how cute! And the fabric that I cut off the sides, I used to make a matching headband. I can't wait for the little one to try it out. 


Cheap, easy, and cute sewing project - what else could I ask for?

Would you sew clothing out of home decor items? How do you channel your inner Maria VonTrapp?

Tuesday, April 19, 2011

Pillow covers, not painting

I need to change the decor around here. Really.

And I want to use color on my walls so badly, but for now I'm holding my horses. Instead, I'm going to make some pillow covers to make things look a bit fresher and new.

Seriously, pillows and accessories are one of the easiest and quickest ways to add some new elements to your house when painting the walls isn't a possibility.

Still, how can you get any more boring and neutral than I did?!? I didn't realize how much I need color until I took this picture of the pillow cover I made on my couch.


So, next project on my list - some brightly colored pillow covers!

Do you have a secret weapon to quickly, easily, and cheaply change the look of your decor? Share them, I beg you! :)

Tuesday, April 5, 2011

Dots, dresses, and doodles

It was an itsy bitsy teeny weeny yellow polka dot bikini

I love polka dots. You could probably tell from my post yesterday. And today, I have more dots to share!

My niece is having her birthday soon, so I decided to make her a summer dress. I found these two dotty fabrics that I liked and decided to get both - one will be for her, the other, who knows? I just couldn't decide which one would look cuter on her. The orange one has this awesome texture, but the blue one is very soft cotton. Hmmmm..... What do you think? She's going on 4, which one would you choose?


And on to something else... I can never have a blog post with only one topic, can I?

I love to doodle. Anywhere, anytime. 


There's this doodling "activity" that I first did as part of the Silly class with Carla Sonheim where you make lines, circles, shapes, whatever on the paper. No plan, no thought, just make a mess, sort of. Then you "find" your picture in it. These two below I did on my small sketchbook while waiting for a meeting. You can see another example in this post. 


I also started doing this with N. Here's what we do:

  1. Give your little one pen and paper and let 'em rip. Let them draw lines, dots, circles, whatever they want.
  2. Then you look at it and find something.
  3. Darken the outline of this "something" so that the little one can see it clearly.
  4. Give it back to them to color the picture, but don't expect the coloring to fit your picture. 
  5. If the child is older, this will probably be fun for them to do by themselves. You can each do your own and compare what you found. :)


Do you doodle? When?

Friday, April 1, 2011

Peasant blouse and a new challenge

About a week or so ago I decided to make a cute and girly blouse for N. in time for Spring. She even picked the fabric herself (I love to give her choices and she loves to make them). My problem? As always lack of time. But have no fear, the internet is here! I found an easy and quick (can you tell I love those?) tutorial/pattern for a peasant blouse over at Indietudes (check her out, she shares some amazing tutorials and patterns)


The blouse:


The little girl who couldn't wait to put it on and go crazy:


 I'm glad she liked it.

Now it's on to a new challenge!  And this time it's not about crafts... *shock*

As you've noticed, I'm not the most prolific blogger out there. I can sometimes go a few days without a new blog post. It happens. I'm pretty laid back about this blogging thing, you know? BUT, I decided to challenge myself by joining the Blogging From A to Z April Challenge!


There are over 600 bloggers signed up for this, can you imagine? And I like the idea of pushing myself to write something everyday based on simply a letter. The question is, can I keep up? And in the weeks leading up to finals too...

What challenges have you given yourself lately?

Wednesday, March 16, 2011

Raffle for Japan

So this is my attempt to contribute to the relief efforts for the affected areas of Japan.

I'm raffling off a recent painting I posted here on the blog and a brand new, made especially for this raffle, iPad cover. You can see pictures and details below.

Here's how it works.

I will ship anywhere in the world where the post office delivers.

Each entry/comment will equal one raffle "ticket" for one of the two handmade items below. It's your choice which one you'd like to enter to win, just let me know in the comment. 


The 8x8 painting based on a loose interpretation of "Snow White" is acrylic on wood.


The iPad case was sewn by me especially for this raffle. As you can see, it's based on the Japanese flag, with a closing flap and a small back pocket for holding a cleaning cloth (for the iPad screen). It's made of 100% recycled fiber felt and it's washable. I used the iPad 1 dimensions, but since the iPad 2 is smaller, it would also fit.


Bids are to be made in US$
Each raffle entry must be a donation of $5 (International Medical Corps) or $10 (Global Giving).

To enter, go to International Medical Corps and make a donation of $5 or go to Global Giving and make a $10 donation for the Japan relief fund, when you have done it come back to this post and leave a comment with your reciept number and you must also leave a valid email address (you can write the address in the format of mymailname ‘at’ hotmail ‘dot’ com)

You may enter as many times as you like but each time you need a new receipt number. 


For help with the donation you can refer to this post http://jojoebi.blogspot.com/2011/03/how-to-make-donation.html


Raffle closes at 12.00pm JST 26th March


If you make a mistake or forget to add you email address please delete the first post and re-write it.


Winner will be drawn by random (random.org).

The giveaway / raffle / auction is being held on this blog, in cooperation with a Bit of This and a Bit of That. We are in no way affiliated with global giving, that's just our chosen method of getting funds safely to the affected area.


If you are not interested in the two items listed above, do check out the other blogs and items being auctioned/raffled off at a Bit of This and a Bit of That. And thank you for your help.

Friday, March 11, 2011

Spring-y skirt tutorial for (very) beginner seamstresses

It's snowing again. A lot.

Sooo, in hopes of calling Spring to us I've been sewing lots of floral, fun skirts for N. to wear when Spring does finally come.


Here's what I did:

  1. Cut your fabric of choice the entire of width you'll need (front and back of the skirt) - for N., a 2T size, I cut 24 inches
  2. Measure 1/4 in on each side, fold and iron well.
  3. Measure a 1/2 in at top, iron, pin, and sew leaving the middle open to pass the elastic through.
  4. Pin and sew ribbon along the stitches at top (optional)
  5. Pin and sew ruffles at bottom (optional) - this was tougher than I thought. The fabric was stretchy and keeping my stitches straight turned out to be mission impossible for me.
  6. Cut elastic a much shorter length, so that the top will bunch up, but not too short that it'll be too tight. For N. I cut 18 inches of elastic and that worked out great.
  7. Using a diaper pin or something similar, grab the elastic and pull through. Since there's more skirt than elastic, when the elastic end is getting close to the fabric opening, pin them together so it won't go completely through. Once both ends of the elastic are once more outside of the fabric, pin and sew them together (1 inch).
  8. Cover the sewed section of the elastic with the fabric.
  9. Using the 1/4 inch folds you ironed earlier, pin and sew the skirt closed - sew the 1/4" right sides together, including the ruffles.
Done!

Care to share your easiest, fastest sewing project? Or it doesn't have to be sewing - all crafts are welcome here. :)

Monday, March 7, 2011

Here, but not here

Sorry everyone, I'm swamped.

I have to unplug for a week or so while I tend to work related projects. I'm still keeping up my resolution of working on something creative for at least 1/2 hr each day, but I don't always find the time to post it here.

What I miss the most? The connections I was forging. I miss you all. I hope to be back soon, hopping on over to your lovely blogs and seeing your friendly spaces.

Until then, here's a little peek at some sewing that's going on in my crafting room.


I hope you're all having a wonderful week, and I can't wait to be back full force. Xoxo

Sunday, February 13, 2011

Homemade Valentines Part I

This is the first in a two part installment series... Really I just haven't finished all the projects, but I figured I'd share what I have.

I'm not a fan of the commercialism of Valentine's day, but I do appreciate the sentiment of showing your loved ones some extra tenderness. So I usually go for handmade gifts, of course.

I made these drawstring bags to fill with homemade chocolate lollipops etc (will share those soon) and give to N.'s daycare teachers. They are wonderful. It's a sanity saver being able to trust and like the people you leave your baby with when you have to go to work. So, yes, they get homemade valentines.

Here's the pattern for a finished size of 4x6 bags:

1) Cut your choice of fabric 5' w x 8' h - I used white muslin.


2) Wrong side - Fold and iron 1/2 in on each side and keep folded. Fold and iron the top 1/4 in, then 1/2 in keeping the original 1/4 in folded. Pin the top.


3) Wrong side - Sew the top using a decorative stitch, leaving as much as you can of the 1/2 fold opened to pull the string through.

4) Wrong side - Cut a very small slit where the top fold meets the side seams. Fold and iron the fabric width-wise.

5) Wrong side - Sew the bottom (1/2 in) and the opened side (1/2 in) all the way to where the opening for the string meets the seam.

6) Turn the bag right side out. Pull a ribbon through the opening.


7) Add embellishments to the front of the bag. I cut a fabric and (smaller) felt heart and hand stitched to the front of one bag, then cut felt flowers and hands stitched it to the other.


details: 1) you can use smaller seam allowances; 2) these bags only have one string coming out of one side, while lots of drawstring bags have strings coming out of both sides that you pull at the same time. I wanted to try something different for these.

Do you celebrate Valentine's day? How? 

Monday, January 24, 2011

A hint of spring colors and a book

I've been in the mood for bright colors. It must be my anticipation of spring, as far as that seems right now (yeah, temperatures were around -7 F, or -22 C today).

So I ordered some fun fabric from the lovely hip fabric shop and it arrived! 


Now I just have to decide what to do with it. I'm thinking possible a sun dress or romper for N. Or maybe some decorative item for the house. So many possibilities...

Speaking of possibilities, one that I hold dear to my heart is that N. will grow up speaking at least three languages. Maybe I should explain why...

Background: My PhD is in Second Language Acquisition (SLA), I was born and raised in Brazil, and my husband is Japanese. So, back to multilingualism.

Besides being a gift that I can give her and that I think could benefit her greatly in the future, it will also help her connect to her grandparents, uncles, aunts, cousins, and a huge extended family in both countries. 

But there's a problem - she's not exposed to either language outside of the house, and that's not enough exposure to make sure she becomes fluent. So we try to find ways to supplement her exposure through books and dvds. It's a lot easier in Japanese, since we can find materials fairly easily in the US compared to Portuguese. 

This long story is my, a-hem, justification for dabbling into making her a book. 

I've decided that to help her Portuguese, I'll just make my own books for her. I've started with a prototype of a character. Meet Ana Maria Abelha (transl. Anne Marie Bee)!


She'll be introducing N. the alphabet in Portuguese and her first adventure is written, just waiting to be illustrated. It'll take me a while with all the other things I'm working on, but this project is close to my heart. It will get done.

Have a lovely week, friends! And do leave me a hello telling me what I could do with that fabric.