Showing posts with label crafting. Show all posts

Wednesday, March 13, 2013

St Patrick's Day watercolor illustration

Oh March, you craft-tiful month you. With every crafting opportunity you already offer, you bring yet another that almost slipped my mind: St Patty's Day. It was almost too late to make something.

Although I'm not even remotely Irish, I still love this holiday. There's something cool in making everything green. Oh, and rainbows and pots of gold, how can you not love that?

And oh yes, and when you lack frames, use whatever you can find. Like unused embroidery hoops. I can't be the only one with those around...


cheeky little fella

Why is it so hard to get good natural lighting at home? Oh yeah, we live in Portland now...


Want to join? Grab some watercolor supplies, draw something easy (like a shamrock), let your kid paint it or do it yourself, and frame it with the hoop. Have fun trying this out and let me know what you come up with.

I hope you have all the luck of the Irish this week. Happy St Patrick's Day!

Wednesday, February 27, 2013

How to make an egg carton chick for Easter candy

This whole month of February, I've been keeping a theme going of organization and repurposing (see the following posts - blog organizing, recycling a box into a wreath, and repurposing a belt as a headband). Today's post will be the last, for a while, on this theme.

This post recycles in two ways. First, it recycles a common household waste product into a craft. Second, I'm recycling the craft/post. I had published it a couple of years ago on a website which no longer exists. It made me sad to think that one of my favorite little crafts had disappeared into the nether regions of the web. So I decided to bring it back right here with brand new instructions.

Now Let's get to business. 

Have you ever looked at your empty egg carton and imagined all kinds of little critters you could make out of it? Maybe I'm crazy, but that's all I see! The possibilities are endless, I'm telling you. With Easter coming up, here's one that would make nice little additions to an Easter get together. 

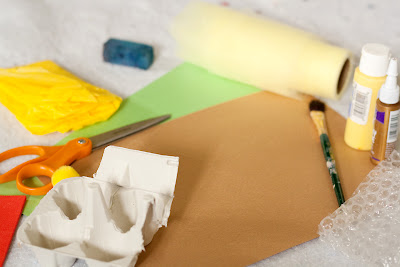
Materials:
  • cardboard egg carton (I like them better than the styrofoam for crafts)
  • construction paper (green or brown)
  • yellow craft paint and a paint brush
  • glue
  • scissors
  • yellow tulle
  • orange craft foam
  • small circular jewels for the eyes
  • a small yellow pom pom


Steps:

1. Cut out the egg cradling parts of the carton, both top and bottom. Each pair will be one chick.


2. Paint the top half yellow and set it aside to dry.


3. While the top dries, cut a strip of tulle and one of green or brown construction paper. Cut thin lines until about 1/4 in from the bottom across the strip to make the grass for the nest. Glue the bottom of the strip on the inside of the bottom half of the egg carton.


4. Glue the small yellow pom pom (the head) on one upper side of the yellow painted carton. Then cut a small square piece of yellow tissue paper and scrunch it up for a tail, then glue it.  


5. Cut a small triangle of orange foam and glue it as a beak, then glue the small jewels as eyes. That's it, you're done!


When you put them together, you've got a cute little chick on a nest where you can store small candy. Just make sure you put some clean tissue paper at the bottom before adding the candy.


Filled with Easter M&Ms and jelly beans!

Have you ever done a craft with your old egg cartons or recycled containers? What was it?

Wednesday, February 13, 2013

Valentine's wreath }{ tutorial

My daughter's favorite color is pink. No surprise then that she goes crazy around Valentine's day, specially if we happen to stop by Joann. And we did.

She begged me to buy half of the seasonal decor on display at the store, but instead I promised her we'd do our own. Lucky for me, she loves to do craft projects. Thus, today's post was born.

As I mentioned in the last post, this month's themes are organizing and re-purposing. After unpacking quite a few boxes we're surrounded by empty boxes, so I decided to use some cardboard for the project as a way to recycle it and save some money as well.

Materials
  • cardboard (or whatever you have that's easy to cut but still sturdy)
  • scissors
  • gesso/paint (optional)
  • paint brushes (optional)
  • glue
  • tissue paper (or other decorations like pom poms or buttons)
  • ribbon
Steps:

1) Draw the heart shape on the cardboard. It doesn't have to be neat since it will get covered up.


2) Cut out the shape. If you'd like a wreath like backing, cut out the middle as well. We ended up using both parts.

3) Paint the backing with gesso/paint. We did this in case some showed through the tissue paper. It turns out you need a couple of coats and my little one was not that patient, so some of her heart has the box' original paint showing through. It didn't matter to her (reminder: crafting with kids is all about the process, not the product).


4) Dry it with a blow dryer (much quicker, helps the wee ones stay with the project)

5) Spread some glue on a medium sized area (~4 inches), rip tissue paper a little at a time, scrunch it up and attach it to the backing. This will go a little faster if you use larger pieces of paper, and if you don't put them super close together. I did (so it took much longer), but the little miss did not. She also decided to cover her middle with the tissue paper.


6) Repeat step 5 until the whole wreath is covered up. This is where you can let your creativity run wild. Use buttons, combinations of colors, glitter, pom poms, whatever. See what you come up with.


7) Cut a piece or ribbon and glue each end to one bump on the back of the heart (to hang it up). Done! After it's dry just go hang it up. The little miss' went outside for everyone to see, but I took a picture of both so you can see them.


Happy Valentine's Day!

Do you make projects inspired by what you see at the store? I'd love to hear examples.

Thursday, January 24, 2013

3 weeks and 3 projects }{ Valentines Day roundup

Alright, I have a confession: I hate moving. You're thinking "no way that's true, she's moved around like a gypsy!" Fair enough. But I really dislike the packing and unpacking, especially since this time I'm also trying to get rid of as much as I can.

Point of the rant above: I'm still working on getting settled in. The crafting materials are still packed, so what's a girl to do? I thought about digging through my old photos that I haven't shared with you yet. Then I had a better idea. Why not do a roundup of some possible Valentines Day projects? There are only 3 weeks left, and this gives you some options.

Project #1: 3 Heart Tea Bags (by Design Sponge)

Aren't these just adorable? Give yourself a valentine or make some to share with your friends. Valentines Day will be that much more enjoyable, no?

Project # 2: Pie box (by Twig and Thistle)

Well, technically this project is a printable. But I had to include this awesome little box! Nothing says I love you like a little apple pie, yum!

Project # 3: Hearts throw pillow (by Diary of a Quilter)


This project is a bit more involved, but isn't it worth it? Gorgeous! Must.make.one.now.

I hope you try at least one of these. Handmade Valentines keeps the sweetness without the consumerist "Hallmark" holiday feel, right?

Kisses!

Tuesday, December 11, 2012

Salt dough ornaments }{ tutorial


Dear friends, I'm beat. I wish I could tell you all that's going on. Soon.

But the Christmas/holiday season is here and if that doesn't inject a hefty dose of energy into a crafter, I don't know what does. The princess and I have been doing small little projects almost daily. On the weekends we go a little crazier and do more involved crafts, like this one. It can be done in one day, but why would you want to put more rush into your holidays?

Materials for the dough ornaments:

  • 1/2 cup of salt
  • 1 cup of flour
  • 1/2 cup of lukewarm water
  • cookie cutters
  • chopstick or a pencil
  • rolling pin
  • cookie sheet
  • parchment paper
  • aluminum foil
Materials for decoration:

  • white craft paint
  • sharpies
  • glitter paint
  • brushes
Steps:


  1. Preheat oven to 250F.
  2. Mix the ingredients in a bowl. It quickly becomes a pliable but firm dough. It's super easy to manage this one.
  3. With some flour on the rolling pin and surface, roll the dough until it's about 1/4" thick. The thicker you make it, the longer it takes to dry (believe me, the princess didn't want to roll it and ours came out very thick)
  4. Cut shapes with the cookie cutters. Make a hole for the string with the chopstick or pencil
  5. Line a cookie sheet with parchment paper and place the ornaments carefully on the sheet. Cover them with foil and bake it for 3-4 hours (depending on thickness).
  6. Let them dry for a while (we left them alone overnight).
  7. Paint them with the white craft paint and let it dry. Our dried quite quickly because we used a blow dryer on the paint.
  8. Draw designs with the markers, add glitter, or finish whatever look you want to give them. This part is up to your imagination.
  9. Cut some string and put through the holes. Tie a knot and voila, you have ornaments ready to hang on your tree.
I don't know why she's so serious. She was smiling a second before.

We had so much fun making them, and the princess is so proud of hers she took them to school to share with her friends. This is an easy but fun way of making ornaments with the kids.


Tuesday, December 4, 2012

Felt Christmas tree }{ Crafting with kids

A while back I came across this project from Olives and Pickles on Pinterest, and I knew I wanted to try it with the princess. We love Christmas projects and this was easy and fun.

I also had this tray frame that I got on sale and that begged to be used for framing something fun. I put the two together - let the princess make some art and then frame it with the tray. My plan is to use it for different seasons and holidays. Simply change the background and the art piece as the year goes by.


Materials:

  • green and brown felt
  • yellow felt or gold card stock
  • buttons of several colors
  • glue
  • silver glitter
  • a large piece of card stock in a color that contrasts with green and gold
  • a frame


Steps:

  1. Draw a Christmas Tree on a sheet of green craft felt (or you can use a template) and then cut it out.
  2. Cut out a small square of brown felt to be the tree trunk.
  3. Draw and cut the yellow felt or gold card stock in the shape of a star.
  4. Gather some buttons, the glue, and the glitter. 
  5. Let the child decorate the tree. With older kids they could actually do the previous steps as well, but I decided to have it all ready for her to make it a quicker activity. She can get tired quick if it's too hard and involved.
  6. Add the tree and the trunk in the frame facing down.
  7. Place a contrasting card stock sheet on top of the tree for a background. I chose silver since it's sparkly for Christmas and out of the card stock I have it provided the biggest contrast.
  8. Close up the frame and place it somewhere where everyone can see, and show your kiddo how proud you are of their work.

So I did turn the original project into a little art project rather than math play. The great thing about inspiration is that you can turn something you find into something entirely different and have two activities instead of one.

  I'm Topsy Turvy

Tuesday, October 23, 2012

Halloween Lunch Bags }{ Tutorial

With the 31st of October just around the corner, I feel like everything is excuse to do some cute Halloween-y craft. This one is easy, perfect for the little ones in your life, and made with simple materials you can find in almost everyone's home.

So let's get crafting.

What you need:
  • paper lunch bags
  • construction paper in white and black for the mummy (and for the vampire as well)
  • glue
  • scissors
  • crayons and markers for adding details (optional)
What you do (for the mummy, the easiest one):

  1. fold the open end of the lunch bag down about 1/4 of the full length (see picture)
  2. fold the bottom so that both sides are going down (see pictures)
  3. cut out shapes from the constructions paper: white and black circles for the eyes, a crooked mouth, some longer strips of white construction paper.
  4. Glue the strips of white paper all over the bag with the top folded down; lastly add the eyes and mouth. 
  5. For other characters like the vampire or the owl, this is where you'd add some extra details with crayons or markers (e.g. blood on the fangs).


The steps are the same no matter what character you make, but the shapes you cut out and the construction paper colors are different obviously. I can also imagine how easy it would be to do a Frankenstein one, or a skull. What Halloween monster/character would you make?

Tuesday, October 9, 2012

Glittery Spider Webs }{ holiday crafting

Ready for a "why didn't I think of that" moment? At least that's how I felt when I saw this idea on Pinterest (originally on Redbook). So easy. Why didn't I think of that?

We did this with a 4 year old and a 7 year old, and it was a hit with both. It was also messy and a bit hard for them to get it just right. So we helped. The hardest part is waiting for the glue to dry.

Materials:
glue
glitter
wax paper
patience

What to do:

  1. Cut a piece of wax paper larger than you want the web to be and place it over some cardboard.
  2. With glue, draw a spider web on the wax paper - start with 8 straight lines, like you're cutting a pie into 8 equal pieces; then draw curved lines connecting the adjacent straight lines to each other. Look at the picture to see what I mean.
  3. Cover the glue in glitter. This was hard for the kiddos to do thoroughly, so we helped by shaking the cardboard and wax paper around a bit until all the glue was covered.
  4. Wait until it's dry (3-4 days) and carefully peel the web off the wax paper.


The cool thing is that you can use the technique to make all kinds of designs. Sooo many glittery possibilities...

Are you ready for Halloween?

Wednesday, October 3, 2012

Painting Mini Pumpkins }{ crafting with kids

Here's an idea for an easy and fun activity during a Fall afternoon: painting some mini pumpkins.

These mini pumpkins are very inexpensive at pumpkins farms, but our grocery store also offers them as a kit that comes with some paint. Everything you need is right there in the package. If you get the pumpkins individually, acrylic paint should work fine.

Just give the kids (and adults!) some paint, brushes, sharpies or paint pens and let them come up with whatever design/pattern/faces they want. Fun for the whole family. And I also like the mini pumpkins early in the season because they don't rot as quickly as the bigger ones we carve every year.


Apologies for the wonky photos, they were taken while holding a 6 week old wiggly girl...

How do you like to decorate your pumpkins?

Wednesday, May 16, 2012

Model Magic and plastic lid "cakes"

Before talking about our latest crafting adventures, I wanted to announce a little change in my blogging: Mrs Ricefield is now Mrs Ricefield Crafts and Mrs Ricefield Illustration


This blog was getting cluttered with too many topics, no focus, and just too much variety. I decided to separate my illustration and photography side from the sewing, crafting, etc. So, from now on, this blog will feature the latter, while Mrs Ricefield Illustration will focus on the former. 

___________________________________________________________________________________________________

It's no secret that I have a girly-girly-girl with a very unique sense of fashion. This child sometimes makes Pinkalicious seem colorless.

And yes, she's obsessed with pink.

I've also mentioned before that I like to recycle household items. Put those things together and you've got this project: little doll cakes made of modeling clay and plastic lids + beads.

I originally saw this idea on Pinterest, linking to a post on Love and Lollipops. We did make our own homemade clay using a recipe I had, but it dried quickly and it was breaking so easily that we remade everything using a small bag of Model Magic.

the original homemade clay

tea time with our friends

cakes made with Model Magic


It was a hit. She still loves playing with her little cakes, although all the beads have been taken out by now. I tried gluing them back on, but nothing seemed to stick well enough to prevent her from taking them off. So I just let it go and the cakes are still popular during our "tea" time.

Monday, May 14, 2012

How I feel about homemade gifts

Happy belated Mother's Day to all you wonderful moms!

I hope you spent a fun, relaxing, and fulfilling day with your family.

Warning: very subjective opinions coming up...

There are tons of holidays where we feel obliged to give gifts or otherwise spend some kind of money to show our love for someone. That second part isn't bad - we all need to show our appreciation for those around us, especially those who love us, and taking a specific day to remind us of doing that (let's face it, we don't always think about it) can be a good thing. But I do take issue with something: The push for buying gifts can sometimes take away from the meaningful appreciation of those we're supposed to be honoring.

What I mean is that in our crazy busy lives it's so easy to give gifts without thinking about them. But what if we could spend less and give something more meaningful sometimes? That's where I think homemade gifts come in.

Getting a sweet and customized gift will never get old, no matter how big my kids are. I will always love anything my little girls put time and effort in to give me, whether they cook it, draw it, write it, sew it, sing it, whatever. It's their love put in to what they do for me that will make it so special.

Now, I don't expect everyone to agree with me. I know not everyone is a fan of homemade gifts in any case. I just hope my mom is. ;)


What's your gift giving preference/tradition for holidays?

Sunday, May 6, 2012

Upcycled Lamp ~ girly style }{ Tutorial

Don't you love a good thrifty find?

N.'s room had a tall lamp that didn't really match her girly taste and didn't seem to fit the rest of the room. But I wasn't really looking to buy something new. It needed to be customized.

Then, just the other day I was looking through a garage sale and found a lamp with a nice long, white base with a broken shade. I got it for less than $3... Then I headed to the thrift store and found a  nice shade that fit it. The color didn't matter at all, since I planned on covering it up.

At home, I got a scrap of fabric that was long enough to cover the shade and went to work.

Materials:

lamp shade and base
enough fabric to cover the shade
ruffles (or ribbon)
spray adhesive
fabric glue
craft paint (optional)

Steps:

1. First you need to make a template for the shade to cut use for cutting the fabric. I used directions from this video on how to make the template from the shade itself, and marked it right on the fabric.

2. Then you can cut the fabric a little above the lines from the template (I like to give myself a bit of wiggle room).


3. Next, use spray adhesive to cover both the lamp shade and the wrong side of the fabric. Make sure you cover the surface you're working on... It gets sticky all over with the spray!

4. Then it's time to place the fabric over the shade. This is a bit trickier than you'd think, and don't get frustrated if you have to peel it off and start over. The good thing about spray adhesive is that you can easily that. I started by matching the seam on the original shade with the edge of the fabric, then slowly stretching it around the shade. I started the whole thing 3 times before I got it right.


5. Measure and cut something for the bottom edge of the shade- I used ruffles, but ribbon would have been cute too.

6. Then, using fabric glue, slowly adhere the ruffles to the bottom edge of the shade. Let it sit for a while to dry.


7. Paint small designs on the base using craft paint. (optional)


8. Place the finished shade on the lamp, place it in the room of your choice, and plug it in. You're done!


What's your latest favorite project?

This tutorial has been linked to Skip to my Lou's Made by You Mondays and Sew Can Do's Craftastic Monday

Tuesday, March 20, 2012

A mixed media card }{ tutorial

I'm calling this post a tutorial, but in truth it's more of a process post. What I mean is, if you follow the steps, you may be using the same process I did, but most likely your card won't be the same. You might change the colors, the background, the final touches, etc. In any case, it's been a while since I did a tutorial-like post.

To be completely honest, I'm not 100% happy with how it came out at the end. So I'm asking for help. What would you have done differently?

This all started with an idea to sew ripped up music sheets together. I didn't know anything else about the project, only that it had to include that. The whole process went along without planning ahead - after each step I'd try to think "what's next?" So I gathered a bunch of things I might use, but here's a final list of what I did use:


  • watercolor paper
  • old sheets of music
  • alcohol-free ink
  • walnut ink spray
  • sketch paper and pencil
  • gesso
  • watercolors (and brush of course)
  • scissors
  • matte gel
  • ribbon
  • small jewel
  • sewing machine and thread
And the process:


  1. Cut a piece of watercolor paper and sprayed it with pink ink. 
  2. Then grab a ripped up piece of sheet music


  1. Rip the sheet music into 4 smaller pieces and then sew them together.


  1. Press the edges of the sheet music on the ink pad


  1. Sketch some girls on separate piece of paper. This step in particular can easily be made simpler by using a stamp, like these.


  1. Decide which image to use, color it (or not), and cut it. I used watercolor for this, but I've seen people do amazing cards with copic markers and other supplies too.


  1. Decide on an arrangement on the background paper and paste it together using matte gel.
  2. Put on the finishing touches, whatever you deem necessary. I added gesso on the girl for some highlights, as well as some darker colors for shadows here and there. Then I also added some thread using various decorative stitches to the side, then a jewel to her hat, and finally some ribbon.


So back to my question up there, what would you have done differently?